VW T2 Heat Exchanger Fitting
This is a set of notes that I made as I fitted the exchangers : there are other websites dealling with the procedures.
When
we got the van, there was a perpetual trickle of hot air coming into
the cab which would not stop, regardless of the setting of the heater
controls.
As time went on the hot air dwindled away and so I
decided to take a look at the heater air feed pipes round the engine. I
found the aluminium tubes had fallen apart and cracked where they
joined the fan housing, as they went through the tinware and then at
the heat exchanger end as well.
So at about Ł4.00 each, it looked like a relatively cheap repair.
Then I looked at the heat
exchangers and realised they were a bit rusty and there were holes
round the exhaust tubing through the exchanger where some kind of
grommet had vanished.
In other words, more holes than necessary.
So
I bought a JustKampers heat exchanger kit and a couple of the rubber
boots for the cable ends. Along with other bits and pieces we spent
over Ł300
The kit includes the cables as well as the heat exchangers, concertina hoses, fixing screws, gaskets and exhaust clamps.
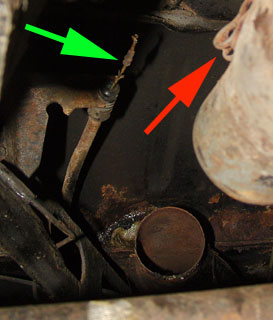
Feeling around , removing the flexible hoses from the heater to the body ,
then
taking some pictures showed a bit of a mess where the control cables
were meant to attach to the heater. The green arrow shows the end of
the cable , and the red arrow shows the attachment to the heater.
They are not joined up ....
This also shows some of the rot with fibreglass in the vicinity of the heater duct.
I am leaving this for a possible weld up so I am not putting underseal on there yet.
Given you have taken the heater concertina hoses off then you can see the end of the bowden cables coming out of the tubes.
These
tubes run all the way from under the front pedal cover plate under
the footwell, just to one side of the heater duct tube.
Removing the heater cables
To remove the old cables, remove the rubber boot from the end.
Then
push the black plastic tube end out of the metal bracket - I found you
could lever it out with a screwdriver. Then pull the black end off.
Keep it.
Now prise out the split nylon insert from the end of
the tube. Remove it from the cable inner by pushing a fingernail
into the split and opening it a little to get it off the wire.
Keep the insert.
Make sure there is no wire wrapped round the end of the cable
(botched repair attempts) before trying to pull the bowden cable from
the front of the car
Now
all the ferrules on the end of the cable (if they remain) can be pulled
back into the tube. as you pull the cable out from under the
footwell. The ferrules will catch on the end of the tube and need
to be helped into the tube.
Either cut the ferrules of the end of the cable or help them in.
The cables are attached under the dash to a bracket held in with a
spring clip which hooks through a slot towards the centre of the car
and clips over the outer end of the bracket.
Remove and keep the cable clamping clip.
Remove
and keep the circlip holding the pair of cables onto the right hand
heater control, using a small screwdriver to lever it off.
You can now disconnect the old cables.
Replacing the cables.
Having
pulled the old cables out from under the car, you can now pull them up
through the grommet into the area behind the left hand kick
panel and out of the way.
You will have to feed the new cable back down the same way
Tip
1 : read the labels on the packaging of the cables and install them as
indicated : there is a slight difference in the cable lengths.
Make sure the cables run exactly in the same places as the old
ones.
Tip 2: Clip the new cables to the under dash bracket and
connect them to the control lever as soon as possible - the lengths
will then be more correct.
When they are fed back in, the ends of the cables may look like they are different lengths.
But
before panicking, fit the little nylon split inserts over the cable
inner between the outer and the first ferrule which is an endstop, and
push this back into the tube. This should push the cable outer back
into the tube where it belongs.
At this point the two cable ends
should extend the same distance from the end of the tubes , and should
come within about 20-30mm of the ends of the heat exchanger levers (if
they are still attached ... )
Push the black segmented
tube over the end of the tube and squeeze it back into the slot in the
bracket attached to the car body . This fixes the little insert
in place . Now put back the new rubber boot.
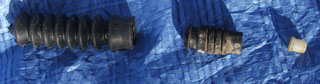
This shows a new rubber boot, the black segmented tube and the insert.
Removing the old heat exchanger
Then
the nasty bit started. I began with the lower of the two
nuts on the exhaust port where the exhaust tube is connected to the
front of the cylinder head. I couldnt get a ring spanner on the nut and
the open spanner just started to round off the nut.
At this
point I decided to jack up the car and remove the nearside rear
wheel for better access and then lower it onto an axle stand. As I did
this the jacking point began to deform, and then the axle stand began
to sink into the tarmac.
So to make sure, I wedged the wheel back under the body.
My
nut splitter wouldnt fit the exhaust nut either as it needed as much
clearance as a ring spanner. So off to get the cold chisel and
the club hammer to try and split the nut. As soon as I gave the
nut the first whack with the hammer and chisel, it started to move and
then was only finger tight , so I could take it off.
I found the upper nut was tight , but with an aluminium tube over the spanner I could get enough leverage to undo the nut.
Then
dismantling the exhaust clamp the other end of the heat exchanger
turned out to be slow as the clamp was rusty and it twisted up as I
undid the clamping bolt.
The old exchanger came off and then
revealed itself to have been jammed permanently open in the 'hot'
position. So thats where the hot air came from all the time.
I
fitted the new exchanger , which I had painted with high temperature
paint already. This went on easily except for fighting with the new
exhaust clamp which was cunningly arranged so the joint packing was
slightly wider than the gap between the clamping bolts which were
exactly the correct length when clamped. So this took some time
squeezing with the pump pliers before I could get the nuts and
anti-shake washers on the clamp. At the other end the new exhaust
gaskets went on easily.
The offside exchanger took a fraction of the time - I didnt need to get the wheel off.
The new heat exchangers fitted better and I was easily able to get the ring spanner on all of the nuts .
But
somewhere in the process I rolled over, gouged my glasses on a bolt
protruding from the end of the engine mounting bar , and cut my lip on
the bottom of the bumper.
I am going to get the suspension raised !!!
There
was then a lot of messing about with the cables as I had installed them
the wrong way around and they had to be swapped over - not too hard
except the ferrules catching as mentioned before. Just do it right
earlier.
I had already assembled part of the cable attachment
for the levers on the heaters, but I noticed the circlip would pop off
quite easily - to prove to be a trouble later.
I then inserted
the new concertina hoses - these are hard plastic and are too stiff to
bend to meet the differently angled pipes which they need to be
connected to. They are ended and there is a large end which goes on the
body duct and a smaller end that goes on the heat exchanger end. All I
could manage was to get the body end OK and the heat exchanger end
pushed over the end but not fitted. It needs pushing with something
like a piece of wood or heaving on a warm day from properly under the
car, to bend the concertina hose..
I had a near miss when I
got the side of my hand pinched between the tube and the heat
exchanger, but in the end it came out without breaking the skin.
Then
I attached the offside cable end without too much trouble, adjusting by
slightly tightening the clamp bolt and pushing the air outlet flap
closed while the dashboard lever was fully up. Then I tightened it more
fully.
On
the nearside, the circlip fell off once . I recovered it with a large
magnet from the ground, tried again but the access was bad because I
had already replaced the wheel.
So I took the pin and circlip out and replaced it with a stainless M4 bolt with a Nyloc nut from my boat parts collection.
This time I got both hands in (lowered suspension is a total pain) and managed to do the same clamp adjustment.
Now I get lots of hot air.