 Standing Rigging
Masthead Boats Rigging
The baby stay is not braced below the deck as
standard - as the deck bends the fore hatch cracks.
Lowers can lift deck on this rig as they are taken aft to the tie
bars under the deck, which are not aligned with the force of the
rigging. A hull dimple may also appear as the tie bar moves inward and
upwards.
Fractional Boats Rigging
Spreaders on Fractional Rig : seem to become more raked with time -
my mast has small dimples at after end of speraders.
Fractional rig - deck distorts at base of shrouds. This is normal
and my surveyor passed this as OK (he used to own a GK24)
Why ? : The fractional rig (FR) mast is stepped on the keel about
40 cm forward of the bulkhead that would support a masthead rig (MR)
mast on deck.
The rake of the (FR) spreaders means that the shrouds come to the
deck another 30cm aft of the bulkhead. There is an internal strut but
this has no adjustment and is angled. In order to get rig tension you
have to bend the deck !
This also leads to a greater force on the tie bar as both lowers and
uppers are pulling in the same place.
I had the boat rerigged this year (2009) and the riggers put the
uppers on the chainplates forward of the lowers gaining some angle on
the boom, as the lowers and uppers cross over at about boom height .
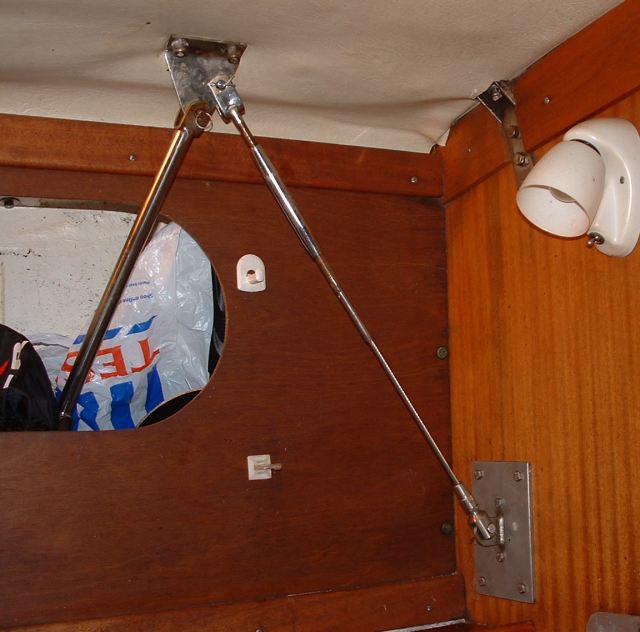
Adding internal rigging wire
A possible cure for the deck is to add an additional internal tie bar
or rigging wire. I took this route and I am still evaluating whether
more reinforcement is needed.
I will be writing an article about this when I am satisfied. In my case
the constraint was that there should need to be no disturbance of
anything already in the hull. On the port side this was easy but to
starboard the removable chart table was the constraint on how low
I could place the pad eye on the bulkhead on the starboard side.
For symmetry, I placed the pads in the same relative positions port and
starboard.
The S/S plates were fabricated by a relative who used it as
self-training for his fabricators job.
The bottlescrews came from a secondhand chandlery, but it took the
purchase of 4 bottlescrews before I had a pair that had not been
stretched.
I drilled a hole in the triangular plate under the deck and
fitted a clevis pin through it . In the end I reversed the pin so
that the split pin faced away from the cabin.
The rigging wire came from my re-rigging after 20 years , complete with
swaged on ends. I used some Ł10 Chinese boltcroppers to cut
it and they worked ... (Bolt croppers constructed to an accuracy of
about 3 mm, I have never seen such wibbly wobbly nuts and bolts) The
bolt croppers are therefore in my tool locker as I had an unfortunate
experience (not my boat) in 2004, and I now value bolt croppers as
being somewhat useful on a boat.
The other ends are Norseman screw-on terminals and by a process of
shuffling in the second-hand chandlers I managed to get two with the
little insert 'bullets'. These just tighten up and grip the wire
without the need for a hydraulic press.
Then I just tightened up the bottle screws and waited. The tension
remains in the wires and the rigging above deck is now tighter.
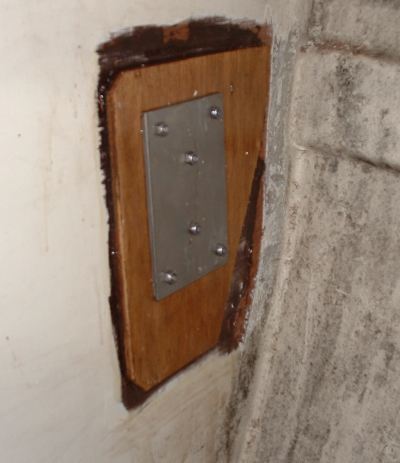
The backing pad: 13mm ply epoxied to the bulkhead.. I propose to
glass this in with some tape as well.
Water ingress through mast and boot
FR water runs down mast and fills up around mast foot by heads.
Page © Mike James 3 February
2005
Comments to:
mike@hamble.demon.co.uk